I’m excited to share with you how I wood burned the cutest simple rustic woodland animal Christmas ornaments for my tree.
But, first…
This the 1st stop on our FOURTH ANNUAL Handmade Christmas Ornaments Blog Hop.
Just like each year past, you can expect to be inspired by all kinds of lovely Christmas ornaments created by our extraordinary bloggers. This year, we changed things up… we’re doing TWELVE DAYS instead of the usual 31… with ALL of the creativity and inspiration you’ve come to expect. So… how about we get on with the fun?!

Last year I created my favorite Christmas ornament of all time, a Simple Rustic Birch And Pine Cone Christmas Ornament. That ornament caused a huge chain reaction! I went from making just one ornament to a bevy of pretty birch and pine cone woodland ornaments. AND… because they were so unlike any others, I created more rustic ornaments with a farmhouse feel. Enough to fill a WHOLE TREE! A Nature Inspired Rustic Farmhouse Christmas Tree!
This year as I was deciding what to create for our Handmade Christmas Ornament blog hop, I was flipping through a fall decor magazine where I saw an artist creating wood burning art for the kitchen. It perked my interest and I thought, why not give wood burning a try?
Many years ago I took a woodworking class as part of our town’s community education program. I made a very simple nativity set and used my friend’s wood burning tool (that almost burnt my hand off because it had virtually no insulation!) to detail the wood so it would be more obvious that the figures were Mary and Joseph. Just a few simple straight lines.
This post contains affiliate links. I earn from qualifying purchases at no extra cost to you.
Pretty much I was starting over from scratch with this attempt at wood burning. I purchased this $14.99 wood burning tool
Amazon has some other wood burning toolkits that offer more for just a little bit more money. Now that I have made my ornaments, I just might opt for the wood burning tool with the variable temperature settings

If you’re inspired to make your own rustic wood burned Christmas ornaments, the first thing you’ll want to do is get some scrap wood, plug in your wood burning kit (following the instructions before you start), and practice using the different tips to see what they will do. Also, practice on one of your wood discs (you can always make it the backside of the ornament) so you know how the hot point will slide on the wood.
Once you’ve experimented with your wood burning tool and know how it works, you’re ready to make some ornaments.
Next, you need a design or several designs.
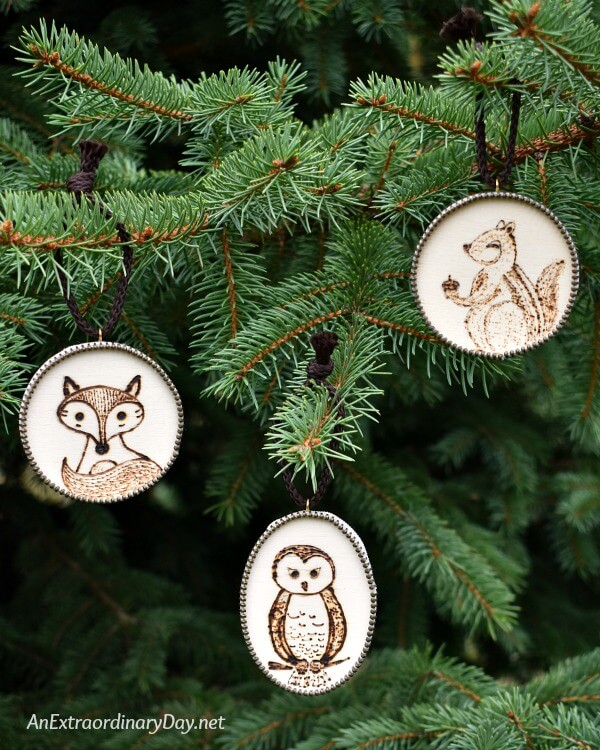
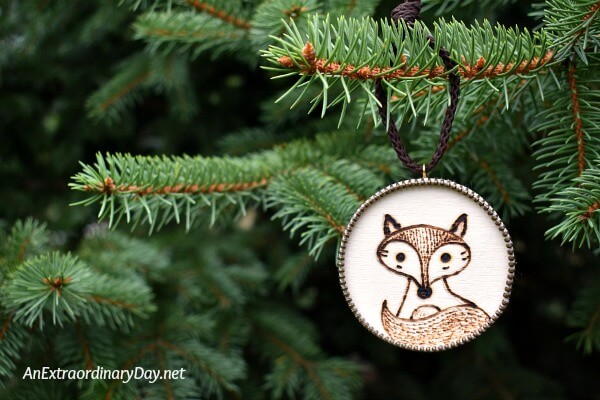
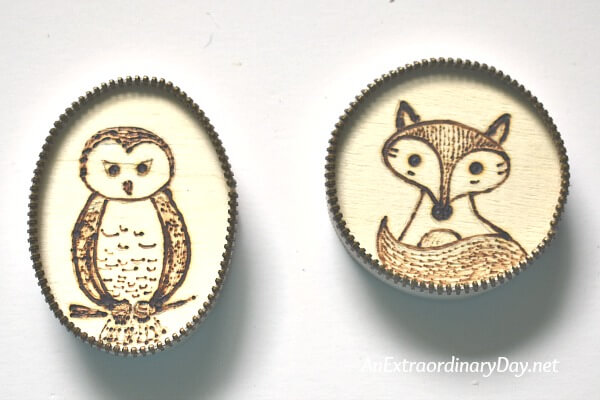
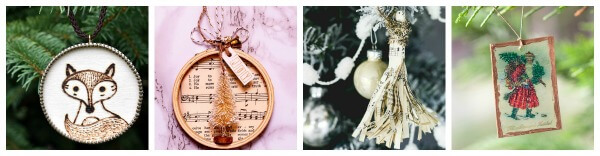
Because my tree is nature inspired, I decided that woodland animals would make great designs.
Now before I go any farther, I must tell you something. I am not a drawer. As in drawing is not my art. Never has been. I’m more of a sculpting kind of person.
Years ago I led an artistic team in creating fascinating children’s environments. When my team got together with me, I would share my vision and ideas, verbally. Yes… I made some very rough sketches and always apologized for my chicken scratch and they always laughed at my “designs.”

Read: Birch Branch Winter Woodland Tablescape
The point is… don’t think you can’t draw well enough to make woodland animals. YOU CAN DO THIS!
I went online and looked for animal images that were simple and used those as guidelines for sketching out my animals and you can too.
So now that we’ve gotten these important things out of the way, how about we get started.
How To Make Rustic Woodland Animal Christmas Ornaments
Supplies
- Wood burning tool
- Pliers
- 2.5″ natural wood discs
- Pencil & Eraser
- Zipper Tape by the Yard
(I found mine at my local fabric store by the bolt. The tape was like a one-sided zipper with no pulls or stops.)
- Heavy Duty Scissors and/or Fiskars Snips
- Aleene’s Tacky Glue
- Brass Screw Eyes 15/32″
- Decorative Cording or Ribbon for the Hanging Loop


Instructions
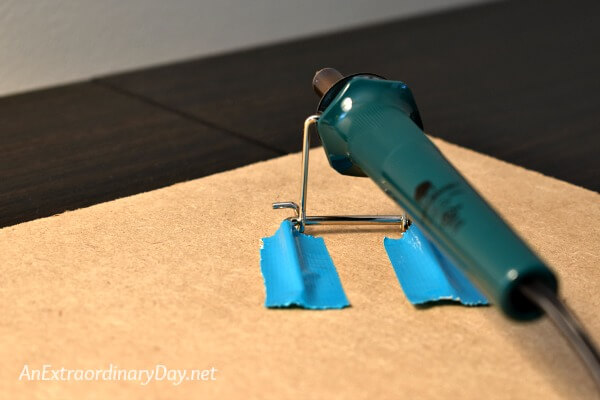
Set up your work surface. I used an extra piece of MDF board for my work surface so that I wouldn’t damage my desk. Also, be sure to tape down the stand for your wood burner so it doesn’t accidentally slide around.
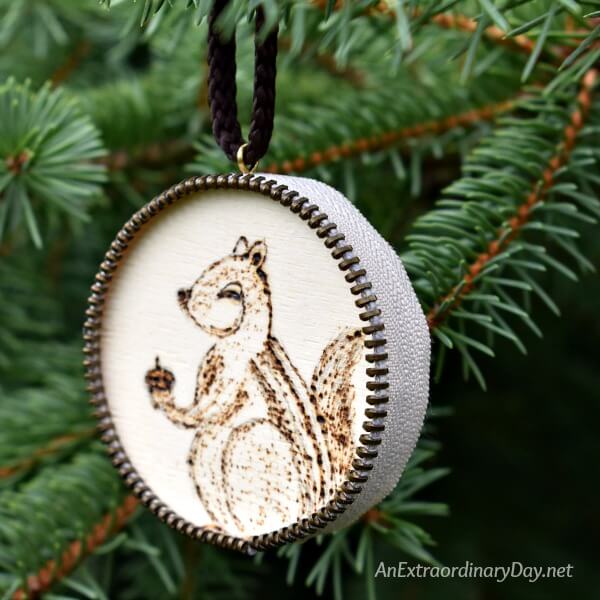
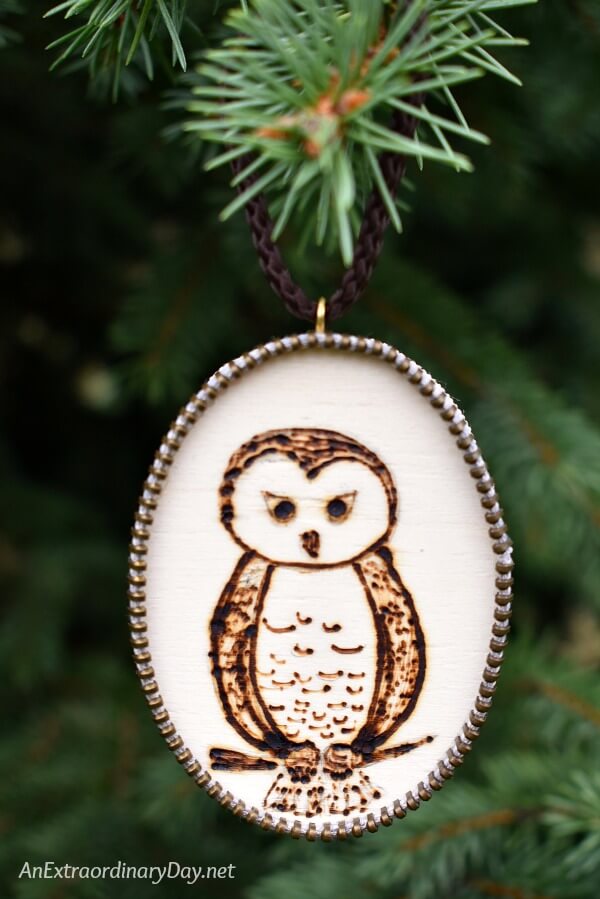
Draw your animal design on your wood disc in pencil. Get creative and have fun creating your little works of art. And remember what I said previously. You CAN do this!

Using your wood burning tool, burn the lines you drew with the various points you selected. (Remember it’s HOT. Use caution so you don’t get burned or burn your surface. And be sure to let it cool before changing points AND use pliers to change the points. The points stay HOT for a LONG time.)


Once you are pleased with the design you’ve burnt, run the eraser over any pencil lines that are showing.
Now it’s time to trim the edges of your ornament to frame your design.
I chose to use a rustic looking zipper tape for my trim. You can use velvet ribbon, cording, or whatever looks fun to you.
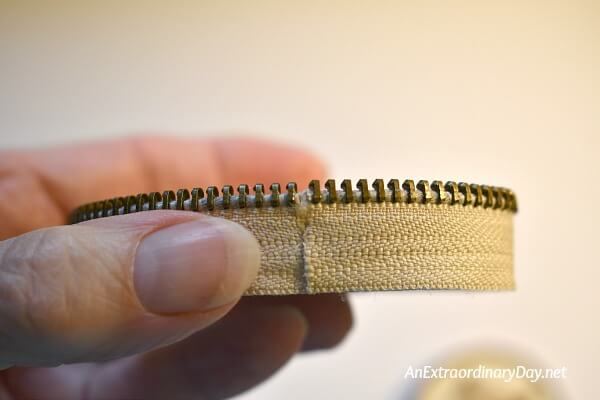
Wrap the zipper tape around the ornament and with your snips
Add a bead of glue to one half of the edge and place the zipper tape around half of the ornament with the metal zipper loops going over the top edge of the ornament to frame it.
Add more glue to the second half of the ornament and carefully tighten the zipper tape around the ornament.
The glue will need a few minutes to set up, so be sure to go back and make sure that your ends meet completely and stay together.
Once the tape is dry, find the top center of the ornament and carefully twist your tiny screw eye into the top. After you get it started a pair of pliers will help you twist it on securely. Be sure to finish with the edge of the eye facing the front of the ornament.
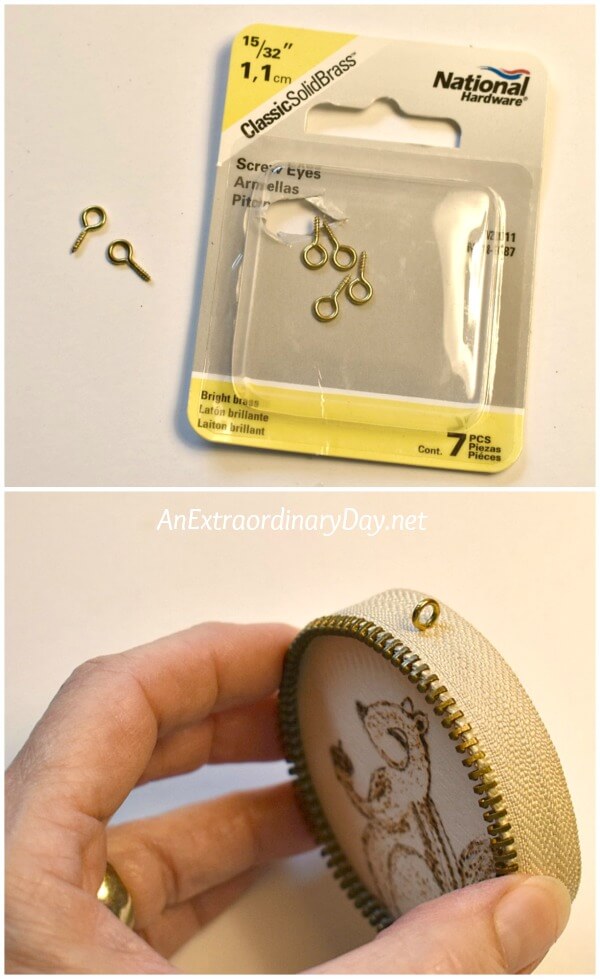
String a decorative cord or ribbon through the eye and tie off. Now you have a hanging loop.

And that’s it!
It’s really pretty simple.
Now you have beautiful yet simple rustic wood burned ornaments to decorate your tree, or packages, use as napkin rings, and more!
You can create more than woodland birds and animals. You can make snowflakes, trees, and pretty much anything you can draw.
Just like a snowflake, each of your ornaments will be different. That’s the beauty of handmaking your own Christmas ornaments. Each is unique and different and beautiful… just like you.
I hope you sit down and get your creativity on for a couple of hours. You’ll be thrilled with the results and have the beginnings of a simple natural Christmas that’s absolutely gorgeous.
- Do you enjoy decorating your home for Christmas with nature’s beauty? I’d love to hear what you do.

READ: Make the Tree Sparkle with Classy Marbleized Metallic Christmas Ornaments
Before I send you off to visit all the other participating bloggers, I want to express my appreciation to Mary Beth of The How To Home and Jennifer of Celebrating Everyday Life. Thank you, ladies, for all your help and encouragement in hosting this amazing blog hop. I couldn’t do it without you!
Here are all 12 Bloggers in order of their appearance:
 Day 1/An Extraordinary Day :: Day 2/The How To Home :: Day 3/Celebrating Everyday Life :: Day 4/Atta Girl Says
 Day 5/Hunt and Host :: Day 6/Lovely Etc. :: Day 7/Pet Scribbles :: Day 8/Sweet Pea
 Day 9/I Should Be Mopping the Floor :: Day 10/Remodelando la Casa :: Day 11/Live Laugh Rowe :: Day 12/The Crafting Nook
Follow Diane :: An Extraordinary Day!’s board Handmade Christmas Ornaments on Pinterest.
More Handmade Christmas Ornament IDEAS
How to Make Easy Sailboat Christmas Ornaments
Fun and Easy to Make Mason Jar Lid Christmas Ornaments
to let your friends know and “pin it,” too.


Oh my Diane, These are so stinkin’ cuteeeee!!!! I just love those ornaments especially the fox, too cute!
Hugs
Awww… thanks Cami!! It was all a grand experiment that worked. 😉 I need to carve out some time to draw and create more. Have a blessed day, my friend!! xo
The ornaments you made are so very cute and I think you are pretty good at drawing! The addition of the zipper trim around the edge is a unique touch that looks great. Now that I’ve seen your ornament, I’m ready to pull out my wood burning kit and make a few for my tree.
Thank you, Paula! Seriously, starting to draw small is probably the best place for me to work on those drawing skills. Who knew!? I’m excited that you’re inspired to do a little wood burning, too. I’d love to see what you do, too! You are always so clever!
These are absolutely adorable!! Diane, you have really out done yourself this time!! It’s hard to pick my favorite!! Just about the time I think the Wise Old Owl has won my heart that precious Little Squirrel practically winks at me! They are all delightful and I’m very proud of you for taking on a new task!! Good job and Merry Christmas!!!?
Thank you, Lucy!! I guess it’s good for us to always be constantly learning and trying new things. I think the fox is my favorite… but like you… Hmmm…
Have a blessed day! xo
I love the fox too!!
Shhh…. the fox is my fave, too!!
Merry Christmas, Evangeline!!!
These are absolutely adorable, Diane! You are so talented. I also really appreciate all the detail and tips you gave in your tutorial. Definitely a go-to for woodburning. Thanks so much and I’m so excited to be in year four of our wonderful hop! xoxo
You are so sweet! I think maybe it’s determination. 😉 Somehow… I’ve just GOT to make it happen. 😉
Thanks so much for your encouragement and for being my blog hop buddy. xoxo
I am SO impressed with these Diane! I haven’t attempted wood-burning yet but think yours is BRILLIANT!! And the zipper adds such a fantastic touch!! Great job!!! xoxo, Jennifer
You just made me feel good about the project, Jennifer! Wood burning is an interesting craft. It takes a lot of concentration. 😉 Glad you love the zipper touch. I was pretty excited to have discovered that. I might need to find a way to use it in other projects. {hugs}
One word: ADORABLE!! Such a cute ornament, friend.
You know how to make a girl’s day! Thank you, Kelly!! And thanks for joining us on this fun little journey! xo
Diane, These are adorable!! You’re making me go and dust my wood burning tool. I like to work on this kind of project during the cold months and while watching a favorite tv show, it goes fast. You really knocked it out of the park with these cute creatures! And how ingenious using the zipper around!
Awww… thanks, Cristina! The zipper was an unexpected “happystance.” My local shop didn’t have the trim I was looking for, so I stood in front of the choices and noticed the zipper tape and though… well… I didn’t know I wanted you… but I do!! 😉
These are just the cutest. I tried wood burning at Haven and did not do a good job at all. But you’ve inspired me to give it another try.
Thank you so much, Amy!! I think success with woodburning comes with being able to do it in your time and without distraction. So yes!! Do give it another try. What did you make a Haven?
I really like these. One more way to use my Grandma’s old zippers. Question. Is the hook going into the wood or just into the zipper fabric? Is it hard to find the wood? Does the hot glue make it difficult?. I’ll just have to get this bag of thin wood pieces. I love this. I’m possibly going to find something to trace!, I’m not an artist!, your fox is so cute.
Thank you, Gwen!! It absolutely is a great way to use your grandma’s zippers. I placed the zipper hooks so they were going over the edge of the wood. The tape is firm to the wood and the hooks sort of hook over the edge to rim it nicely. I did not use hot glue to hold the zipper tape in place. I used Aileen’s Tacky Glue. It sets up pretty fast but allows you to make adjustments and it holds permanently. I’m not a fan of hot glue for projects like this. As far as not being an artist… drawing is not my forte. I just studied a graphic I liked and tried to draw something similar. BUT, I’m sure you could trace something… just use some carbon paper under your graphic.
Were you referring to the hanging hook, Gwen? That goes through the fabric and into the wood. It’s a narrow space but it’s super easy to do.
These are lovely, Diane… and such wonderful tips and tricks to make them so affordable! I’m thinking you could actually transfer the outlines easily onto the wood, without having to draw them. 😉
Thank you, Julie!! I LOVE making inexpensive home decor… especially for Christmas.
I’m sure that transfers could easily be made as well and think I might try my hand at that. This was a personal challenge for me and for once… I rose to the occasion! What a great feeling!
All the best for an extraordinary end to your week! xo
These turned out so cute! I love the idea of using zippers to ‘frame’ them. So creative!
Thank you, Carrie! Who knew zippers would make such a good “frame?!” xo
The zipper tape is beyond genius, Diane!! I mean…so fun. And all of the animals turned out so cute, but I think that little fox has to be my absolute FAVE. Love this hop…thank you so much for all you put into it. You are such an inspiration.
Awww… thanks, Kristi!! I love how the better idea comes out of desperation when the first idea wasn’t available. When we dig down it always seems like good things happen.
I’m delighted that you’ve joined us again, too! And congrats on your ornament from last year being featured in Farmhouse Style. Yay!!!!
I have a wood burning tool and might just have to copy these, they are precious! you did an amazing job!!!
That is so nice of you to say that, Kim! I do hope you’ll have time to play around with your wood burning tool again. xo
These are darling, Diane…makes me want to run out and get the burning tool to try it. Just lovely…
With a coupon, Kim, it’s really a small investment, and you never know what you might end up creating. 😉
Thanks for popping by with your sweet thoughts! xo
These are adorable. I’ve never used a wood burning tool, but will be checking Amazon soon. Also love the zipper detail on your ornaments. Perfection. Happy Holidays….a bit early. ~~ Susie from The Chelsea Project
Susie, you always know how to make my day! Thank you! Let me know if you end up trying wood burning, too. xo
I also really admired all the detail and tips you gave in your tutorial. Definitely a go-to for woodburning. Thank you so much & I’m so excited to be in year four of our wonderful hop!
Your wood-burning ornaments sound amazing! I love how you’ve evolved from one favorite to a whole tree full. Reminds me of that time I tried painting rocks for my tree and got carried away. What’s your favorite part about the wood-burning process?