What could be a more perfect finish to your 4th of July dinner or cookout than a red, white, and blue dessert?
How about an American flag dessert?
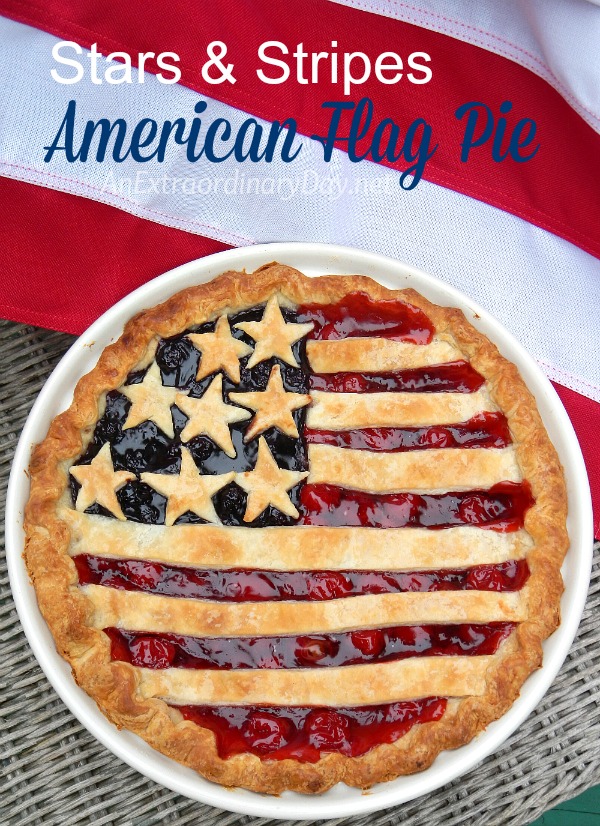
Even better…. an American flag PIE!

This post contains affiliate links. Your purchase through the links does not increase your costs, but I may receive remuneration for your purchase.
This stars and stripes American flag pie is quick and easy to create and it’s delicious too!
Shall we make one now?
Stars & Stripes American Flag Pie
Assemble the following…
Contains affiliate links*
- Pie Plate
- Large Mixing Bowl
- Pastry Blender
- Rolling Pin
I love
- Pizza Cutter
- Small Star Cookie Cutter
or Knife & Star Pattern
- Measuring Cups
& Measuring Spoons
- Aluminum Foil & Scissors
- The most accurate way to measure flour for a pie is to weigh it with a Digital Food Scale
Ingredient List…
- 1 Can of Cherry Pie Filling (mine came from Aldi)
- 1 Can of Blueberry Pie Filling
- Pillsbury Refrigerated Pie Crust or…
- Ingredients for this pie crust recipe I use
Assembly instructions…
- Take one half of your packaged or homemade pie crust and roll it out and lay it in your pie pan.
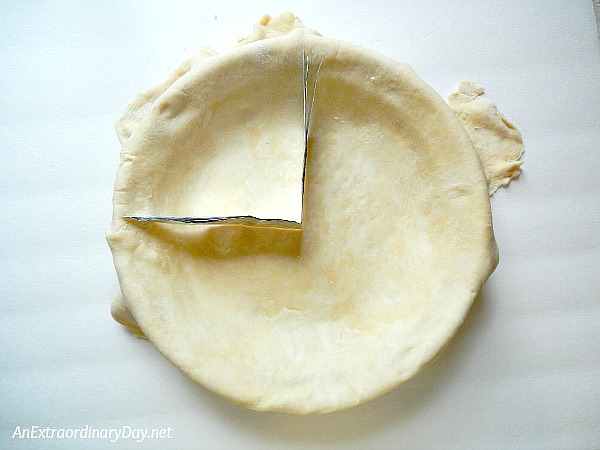
- Make a dam/divider. Tear off a piece of aluminum foil and fold it over several times until it’s about 2 inches high. Then fold the foil in half creating a sharp crease in the middle. Before you lay it in the pie plate, trim the ends to size and shape of the sides of the pie plate.
- Open your foil dam/divider to a 90 degree angle and place it in your pie plate as shown.
- Carefully spoon cherry filling against the foil divider and the same with the blueberry filling.
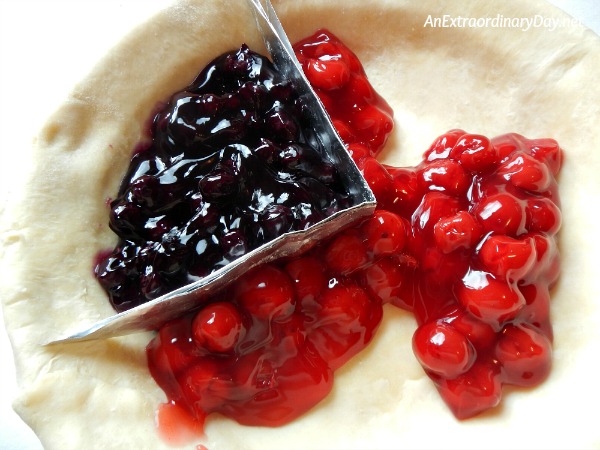
- Use the entire can of cherry filling to fill up the cherry side of the pie.
- Once the cherry is filled top the blueberry side to match the height of the cherries.
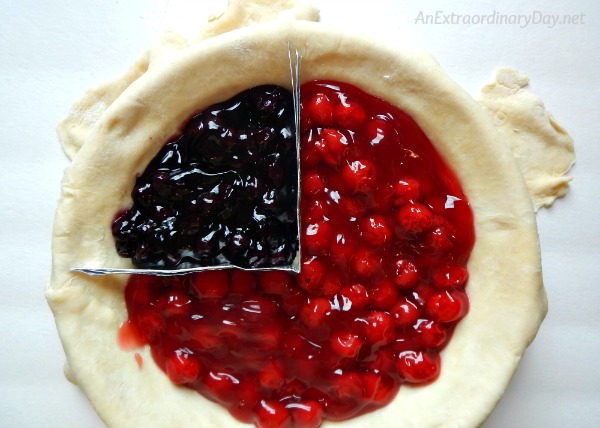
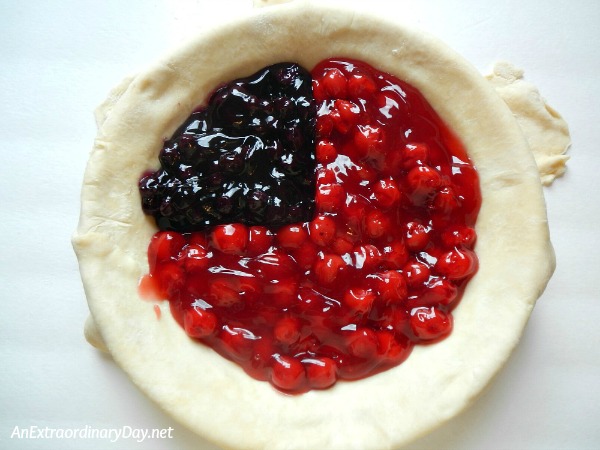
- Carefully lift up the foil divider and you’ll have a sharp clean division of cherries and blueberries.
- Trim any excess pie crust to slightly outside the outer edge of the pie plate.
- Roll out the remainder of the pie crust.
- With a pizza cutter or knife, cut 6 strips of pie crust approximately one inch high and long enough to attach to the sides of the pie as shown.
- Start by laying one pastry strip at the bottom of the blue filling to create a clean line.
- For the stripes next to the blueberry filling, carefully cut one edge at a perfect right angle to place at the dividing edge of the red and blue pie filling and lay across the cherry pie filling.
- Trim and press the edges of the strip laying on the pie crust edges into the crust.
- Continue until all 6 strips have been positioned.

- If you have a star cookie cutter… cut your stars out of the pastry.
- If not… use your template as a guide for cutting your stars as I did.
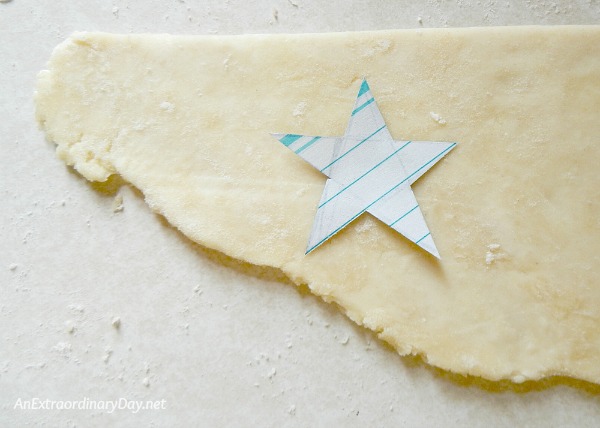
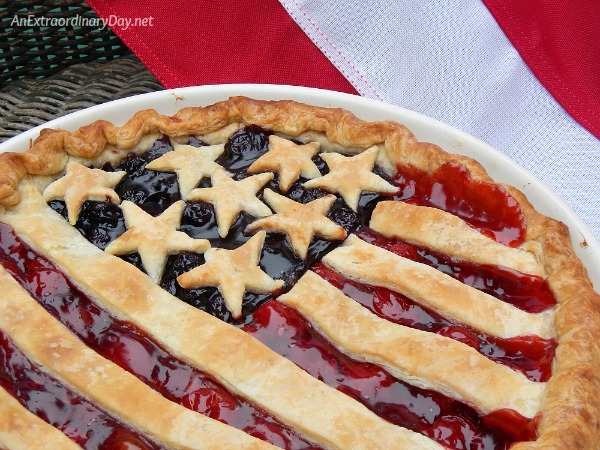
- Carefully lay your completed stars in a pleasing pattern on the blueberry filling.

- Fold the pastry to the inside and crimp with your fingertips.

- Place in a 425 degree oven for 35 minutes or until light golden brown. (Mine baked for 40 minutes… a little too long and a wee too dark.) If you like you can brush your crust with egg white… but I find that makes the pastry a little too brown for me. You could also dust it with sanding sugar… which I never, ever see in the store. So, if you find it… go for it.
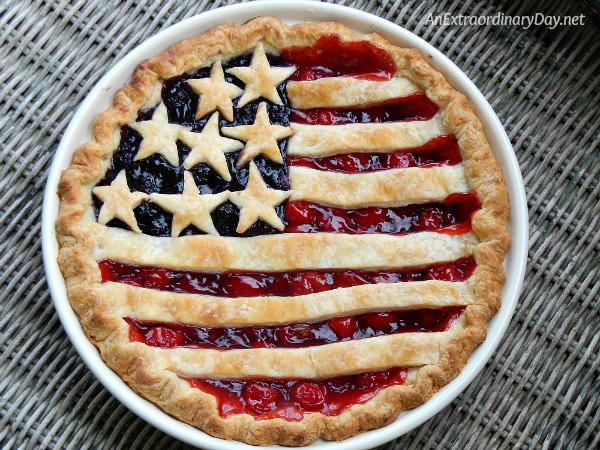
Your own handcrafted stars and stripes American flag pie.
Simple. Easy. And Delicious!

Did you notice… the pie has 13 stripes?
It was totally an accident.
My husband pointed it out to me how impressed he was that I put 13 stripes on the “flag.”
Don’t you just love it when things turn out so serendipitously?
Somewhere in the back of my mind I remember seeing an American Flag Pie a few years ago. So when I was at Aldi last week and saw their cherry and blueberry pie filling I knew I wanted to create the pie. It was very easy to do, and I even made my own pie crust. The hardest part was creating a star template and cutting out the stars. So, if you have access to small star cookie cutters… you’ll want to use those.
Everyone who saw my pie was impressed. And frankly, I was too. There’s something really satisfying about having a project in your mind that you are able to pull off. And… it’s even better if it’s a tasty one.
If you can, serve it slightly warm, topped with a scoop of real ice cream. Yum!
What a great way to celebrate the Fourth of July!!
Happy Independence Day!!

Receive FREE inspiration like this in your inbox!
Sign up Now.
P.S. You’re probably wondering what to do with the extra blueberry pie filling? No worries! Just create some hand pies with the extra pie crust dough like I did here. Yummy.
Patriotic Decorating Ideas You’ll Love
How To Set A Simple But Stunning 4th Of July Table
So Easy… this 4th of July Tablescape Will Make You Celebrate
Decorate a Vintage Window with a Patriotic Wreath and Garland for the 4th of July
How to Make Your Fourth of July Sparkle with Mason Jars and Flowers
One Room, Three Ways :: The Fourth of July Finale’
Easy and Inexpensive Dessert Idea to Make Your Fourth Spectacular
Patriotic Wreaths | Two… Red, White, & Blue Flag Wreaths
Click on the images below for more
Delicious Fourth of July Menu Ideas…


For more 4th of July ideas follow me on Pinterest.
Follow Diane :: An Extraordinary Day!’s board Our Extraordinary Red * White * Blue on Pinterest.
Sharing at a Life in Balance.


This is amazing!!! I love the step by step and how you shared to divide the filling.
Thanks Jennifer! It’s a small amount of effort for a big bang!!
I’ve seen a lot of 4th of July desserts out there but not a one of them holds a candle to this lovely pie , Diane! So simple and it makes such an impact! Beautiful my friend!
This is adorable! We are having company for the 4th this weekend, and I am supposed to be working on my grocery list — glad I decided to do a little blog reading first! Just changed my dessert plans! Pinning and sharing this! Found you from #ThursdayFavoriteThings
Wow! I saw this at the Favorite Things Blog hop …. and it is sure to be everyone’s favorite! What a good idea and an excellent tutorial! Thank you .
Wow, Diane!
You’re amazing! LOVE this pie!
And what a fabulous tutorial! Thank you!!
Sending a big hug,
Suzanne
What a beautiful creation! I would love to share this post with my readers (one picture only with a link back here) with your permission. Stopping by from the Thursday Favorite Things Blog Hop over at Katherine’s Corner. Looking forward to seeing what you share at the blog hop next week! Have a great weekend, Nina @ Vintage Mama’s Cottage
And I would be blessed! Thank you Nina!!
Happy Fourth of July!
This is the most beautiful pie ever!! Pinning this so I can give it a try!
Wow!! That is the nicest thing you could say. Thank you, Meg!!!! {{hugs}}
Wow, what a gorgeous pie! This looks like it belongs on the cover of a magazine!
Awww…. what a nice thing to say!! Thank you soo much! {{hugs}}
Adorable pie! Happy Foodie FriDIY!
Thaks Colleen!
Hope your weekend is extraordinary! 🙂
What size pie tin should I use?
Evs… I used a 9″ pie plate… but feel free to work with whatever you have. Sorry, I’m a bit late in getting your answer… we’ve been out enjoying the festivities of the Fourth! Hope your day has been extraordinary!
Great idea and instructions. I would attach a pic if I could.