I’m pleased to partner with Plaid Crafts and Blueprint Social
to introduce you to .
Add the feeling of fall to your home in unexpected ways.
Often when we think of fall decor we think of pumpkins, gourds, and colorful leaves.
May I challenge you to think outside the box?
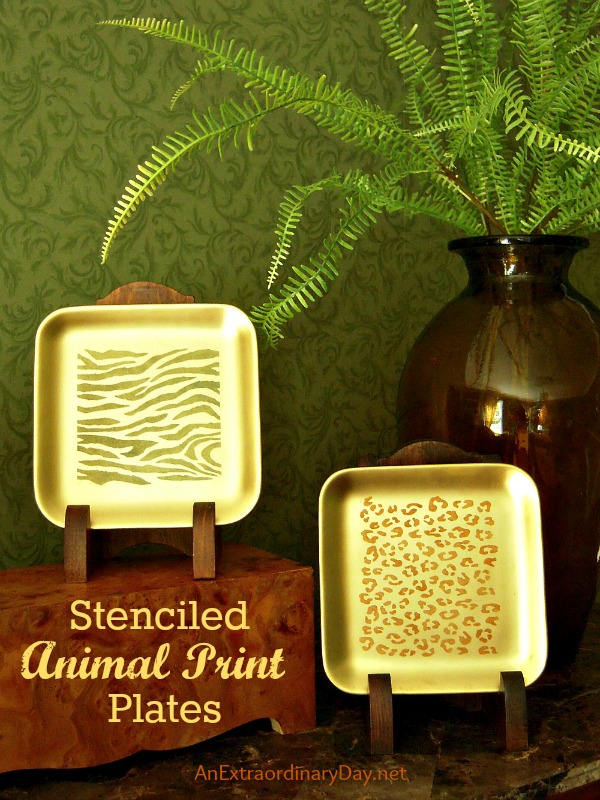
I sure did when I created these fun, stenciled, animal print plates.
Don’t you agree….they’re fabulous and unexpected?
Certainly for my home decor.
Today I’m going to show you how to use stencils, so you too, can create fabulous unexpected fall decor.

Recently Plaid Crafts sent me a package of animal print FolkArt Stencil1 stencils, a paint palette of stenciling colors – FolkArt Stencil Creme, and FolkArt Stencil Adhesive.
What could I create with these items that would give the feeling of fall?
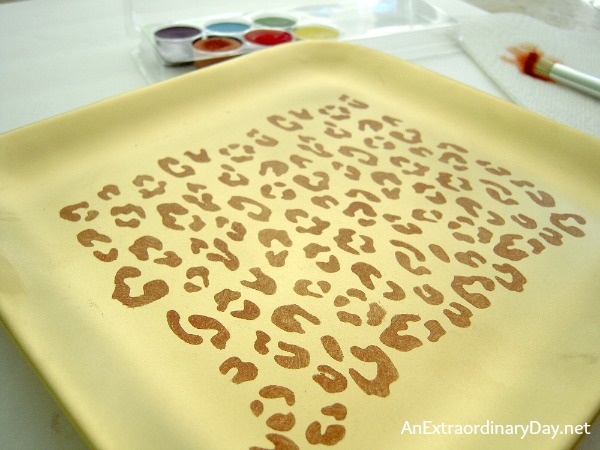
Contemplating the colors and the stencil designs….I made a quick trip…stencils in hand….to my local pricey thrift shop. The day I went they were having a half-price sale. Yay! I thought that I would like to refurbish a tray with a stenciled pattern until I found these pink plates. Are they not perfect?
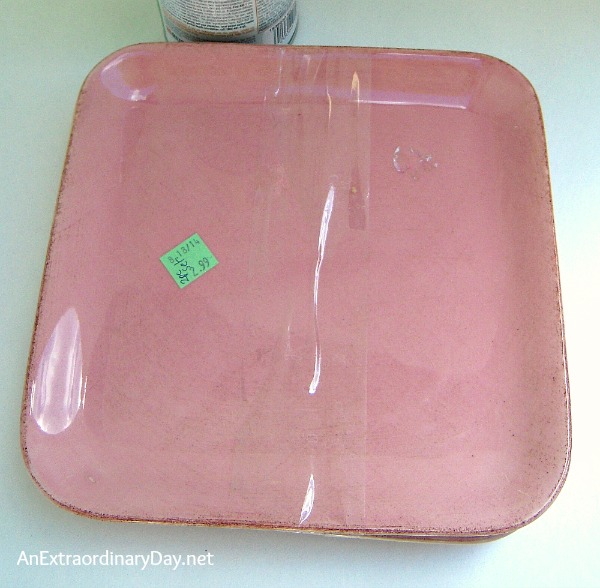
Of course the pink would never do, so I picked up a can of reflective brass spray paint. Word to the wise…reflective means reflective…not shiny.
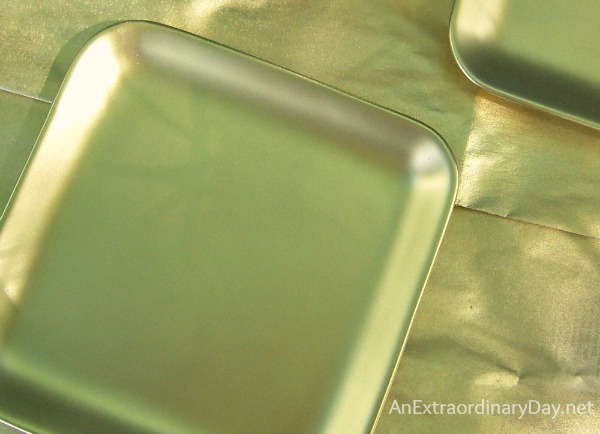
After giving the plates a coat of spray paint and letting them cure for a day or two, I went to work stenciling the plates.
Note: These plates are for decorative use only. They are not to be used for serving food.
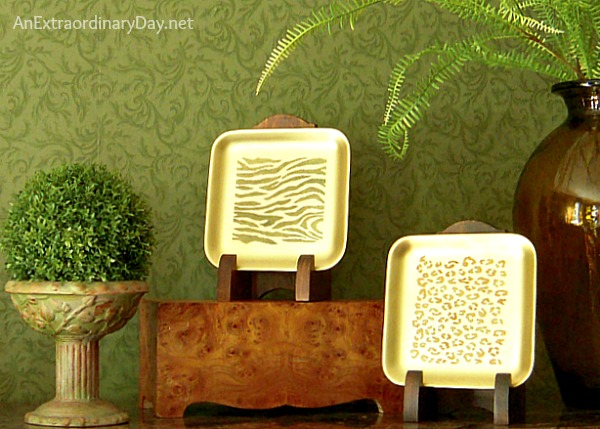
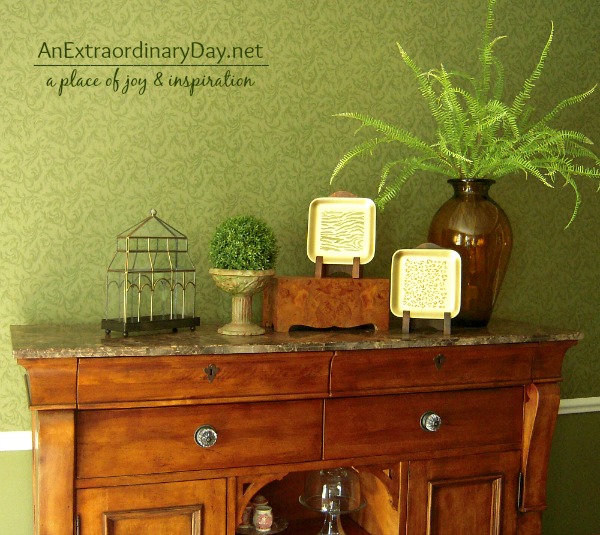
Because I had two plates, I decided on two different animal prints. Leopard and zebra.
The next selection was easier. Since I wanted a fall-ish look, I chose Pistachio and Salmon for my colors.
What do you think? I think they give the feeling of fall and can be used at other seasons as well.
This was my first foray into stenciling.
It’s not hard at all. A little tedious, yes. But, I was able to finish two plates in just a few hours. You should be able to accomplish the task in less than an hour as you won’t be stopping continuously to take a hundred photos. [wink]
Let’s get on with the tutorial….
Decorative Plate Stenciling Tutorial
Creating Stenciled Animal Print Plates with FolkArt® Stencil1 stencils, FolkArt® Stencil Adhesive, and FolkArt® Stencil Creme.
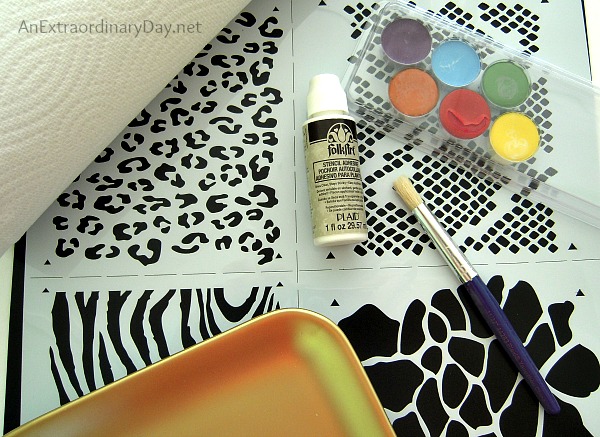
Supplies
- FolkArt Stencil1 stencils (four wild animal designs-item 30978)
- FolkArt Stencil Adhesive
- FolkArt Stencil Creme
- Stencil Brush
– I purchased a Plaid brand for this project
- Paper Towel
- Small Shallow Bowl of Water (not pictured) may be helpful
- Scissors (not pictured)
- Object to be Painted

Instructions
- Cut apart FolkArt® Stencil1 stencils with scissors along perforations.
- Test for layout and sizing on project.
- Trim to size if needed being careful to allow space around the perimeter and keep the repeat markings.
- Stencil1® FolkArt® Laser Stencils are durable, reusable laser cut mylar with lots of detail. Stencil1® is a street art inspired brand founded by artist, painter, graphic designer, DIY enthusiast Ed Roth.

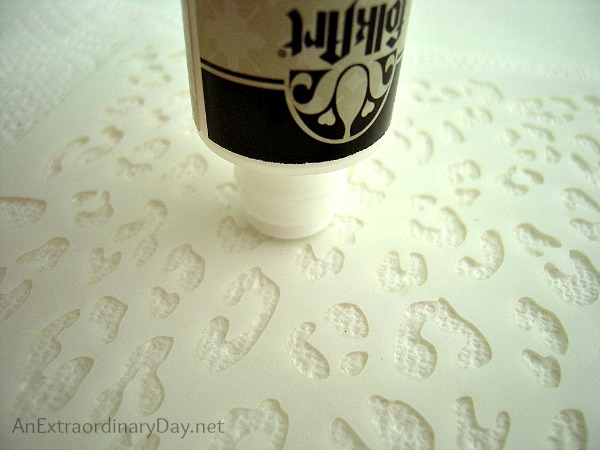
- Lay stencil face side down on a piece of paper towel.
- Apply FolkArt® Stencil Adhesive by dabbing the adhesive applicator on the back of the stencil.
- Do not squeeze bottle or paint with the applicator. (I “painted” and did not get the stencil well-coated with adhesive and had to re-apply.)
- Dab until you have completely coated the back of the stencil.
- Let dry until clear and sticky to the touch (about 10 minutes).
- Take time to read the complete instructions on the back of the adhesive bottle for helpful tips.
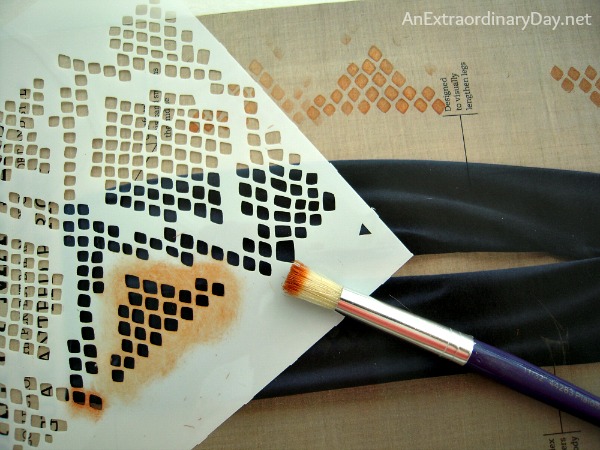
- While your adhesive is setting up, test your color and technique with a stencil you won’t be using for this project.
- Here I practiced on the pages inside an old magazine.
- You’ll like how FolkArt® Stencil Adhesive makes stencils repositionable and thus easier to create perfectly stenciled projects. The applicator bottle is easy to use, dries clear, and cleans up with soap and water.
- Position your stencil as desired. Here I centered mine on the plate.

- You’ll notice that one edge of the stencil does not adhere to the plate. The stencil is stiff and I may not have put enough adhesive on the edge. No worries, I just held that area down with my fingers when I stenciled. It might be helpful to carefully trim the stencil as well..which I did when I created the second zebra pattern plate. Be careful not to trim off the registration marks.
- After sticking your brush in the FolkArt® Stencil Creme, blot it on some paper toweling to removed excess creme.

- Holding your brush upright…dab your brush on the edge of the stencil opening and drag your brush toward the center.
- Repeat until the area you wish to be filled is filled.
- You can do this as lightly or as heavily as you wish.
- Keep in mind that the heavier it is the longer it will take for your stenciled piece to dry.
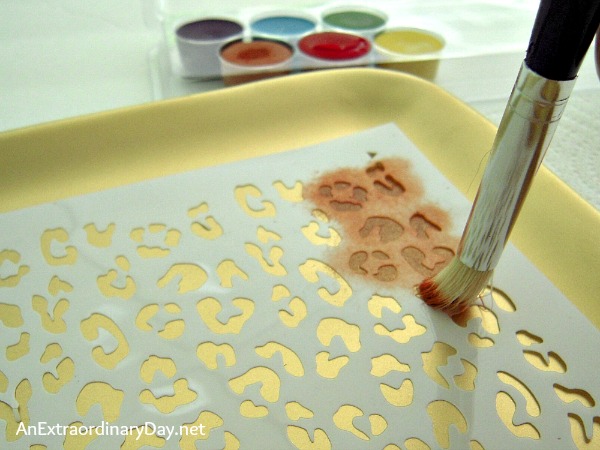
- Continue to lightly apply creme to your brush, dab excess on paper towel, and apply to project, brushing with a circular motion from the edges of the stencil inward.
- Although I did not blend colors with this project, FolkArt Stencil Creme is made to easily blend colors as it is an oil-based “dry brush” paint. It is also a no drip, no run-under stencil creme.

- When you have completed the stencil, carefully lift up to remove.
- Let dry 24-48 hours.
- If you have applied the paint heavily, according to the package, it may take up to 10 days to dry.
- Immediately clean your brush and stencil. I used dish detergent and warm water.
Wasn’t that fun?
Now….let’s do it all over again in pistachio with a zebra print stencil.

Get creative!
Try your hand at decorating some common household things with stencils.
Surprise everyone with your fabulous unexpected fall decor!
You can find all kinds of new FolkArt® stencil patterns and paints,
and more, at Michaels®.
Connect with Plaid Crafts
The Plaid Palette Blog :: Plaid Craft Newsletter :: Pinterest :: Facebook
Instagram :: Twitter :: YouTube :: Google +
Connect with Stencil1
Facebook :: Twitter :: Instagram :: Pinterest
Disclosure of Material Connection: This is a “sponsored post.” The company who sponsored it compensated me via a cash payment, gift, or something else of value to write it. Regardless, I only recommend products or services I use personally and believe will be good for my readers. I am disclosing this in accordance with the Federal Trade Commission’s 16 CFR, Part 255: “Guides Concerning the Use of Endorsements and Testimonials in Advertising.”
Thank you for stopping by today.
I appreciate you and your sweet comments make my day.
If you enjoyed this post….please pass it on to your friends.
Click any of the sharing buttons at the bottom.
Wishing YOU an extraordinary day!
Diane
To receive FREE bits of inspiration like this
in your inbox or reader, subscribe now.


I love stenciling Diane and these turned out so well! I used to stencil all the time back in the day…every room in my old home had a stenciled border or accent of some kind. I still used them occasionally for lettering, but now you have me thinking…thanks for the inspiration!
Oh Kim…I’m so glad you do. It’s so unlike anything I’ve ever done….which makes it easy to second guess myself. 😉
Funny…I always wanted to do some stenciling…I think it was one of those things that I would over think. Sometimes that leads to doing nothing.
Now I can’t wait to see what you’re dreaming up!
Blessings!
Very nice!
Thank you so much Shirlene!!
You are a blessing!
[hugs]
Hi, Diane. Love to see the not so typical ideas too… gets one’s mind working… and at 64, my mind needs as much pushing as it can get!! Thanks for posting the great stencil ideas for Autumn. Have a joyful day.
Awww…thanks Bobbi!!
Age never matters. Some of the most youthful minds are chronologically old and the reverse is unfortunately often true as well.
Glad you liked the ideas! 🙂
Wishing you JOY, too!
Those are super-cute plates – well, NOW they are! Don’t you love thrift items – and half price? These plates must be so happy with their new life! 🙂
Oh yes I love half-price!!!! Thanks for the kind words my friend! I’m pretty sure those plates are feeling mighty happy and loved, about now. 😉
Hi, So glad I found You on Count Your Blessings Link Party/Its Overflowing..Love Your Stencil Projects, and Bookmarked and Fave Your Social pages…Smiles Cindy
What a fun idea! I always love a good animal print, it just brings something a little wild and unexpected to the room. Pinning now, thanks for linking up at Fridays Unfolded!
Those stenciled animal print plates are a wild idea! Love how you transformed them into fall decor. I once tried to jazz up a plain vase with stencils, and it was a bit of a learning curve. What other items do you think could benefit from this stenciling technique?