You went to the garden center… picked out some pretty plants with dreams of having a window box garden like those on Fixer Upper… but really you have no idea what to do. Don’t worry… you’ve come to the right spot to learn…
What You Need to Know to Plant a Beautiful Window Box

My goal today is to show you how you too, can create a beautiful magazine-worthy window box Joanna Gaines would love.
This is a full-blown tutorial filled with planting tips!!
This post contains affiliate links.
You Can Plant a Beautiful Window Box!
To make it easy I’ll be sharing lots of photos and easy instructions, and “how to” tips for creating a successful, gorgeous, window box.
We’ll talk about plant selection, container preparation, potting mix, fertilizer, watering, and more. If you are a seasoned container gardener, I hope you’ll find a tip or two. If you’re a novice you’ll want to pin this for future reference.
For those new to container gardening, I will be using the beautiful window box I planted up last year as an illustration. Keep in mind that these same tips may be transferred to other types of plants and containers as well.
One – Carefully select flowers and plants for your window box.
There’s so much to consider when it comes to plant selection.
- Select plants for your sun/shade requirements… Sun or part sun? Part shade or shade?
- Note the plant’s bloom time. Do they only bloom when the sun is shining? Or if you choose a perennial, will it bloom all season?
- Select plants that will trail over the front of the container, some of medium height, and some that are taller.
- Be sure to mix up your plant selection with both flowers and foliage.
- Choose broad leaves as well as small finely textured leaves for interest.
- Perennials are a good choice for some containers. They can share the glory with the annuals.
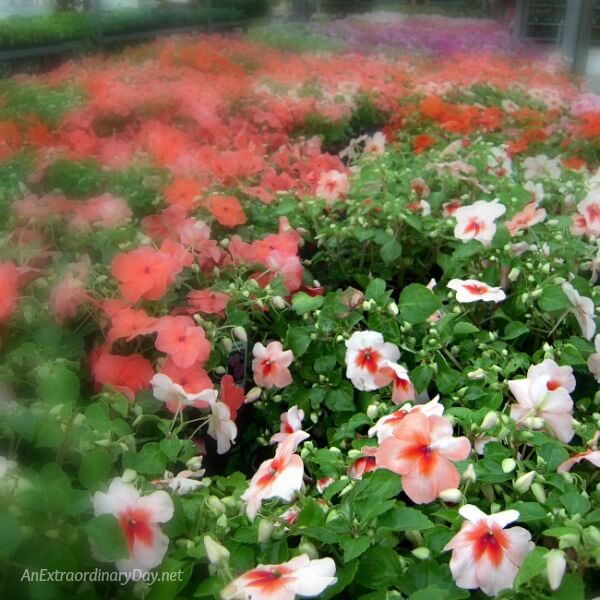
The hunt for the perfect mix is the most fun for me. There’s nothing better than a day spent greenhouse hopping!
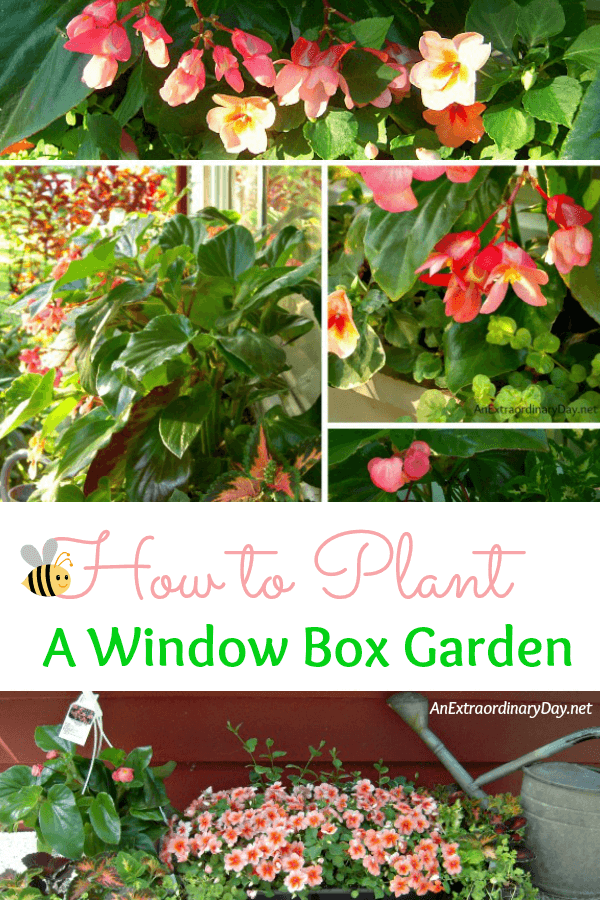
When I spotted these peachy Impatiens with the rusty eye at the greenhouse, I knew they would be perfect for my north facing window box on my rusty-red house. Then, when I discovered they will grow to be 18-24″ tall my decision was confirmed. For a small investment, I’ll get a massive splash of color. Can you see me doing the happy dance?
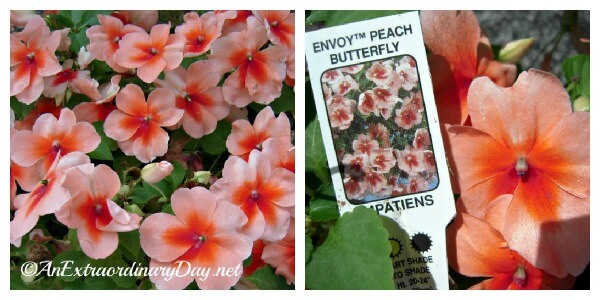
If you’ve fallen in love with these lovely blossoms and are fairly new to gardening, you need to know that Impatiens prefer more shade than sun. Don’t plant them in a container that will spend most of the day… particularly the heat of the day from 11 AM to 4 PM in direct sun. They will not do well and will wilt. Early morning sunshine is fine. They will thrive where there is some direct morning sun.
Here’s another caveat. My Impatiens did not perform well last summer. This was the first time I have ever had that experience. Evidently, there is a fungus in some parts of the country. I don’t think that mine had a fungus because they didn’t die, they simply struggled all season. After a few weeks, when I had a little bit more money, I added some other plants to the window box with tremendous success. (Check with your garden center regarding Impatiens and “Downy Mildew” fungus.) Keep in mind that even award-winning master gardeners have issues with poor performing plants from time to time. If you have trouble… pick up some new plants to fill in for the poor performers… it just might be a happy re-imagining of your window box or container.
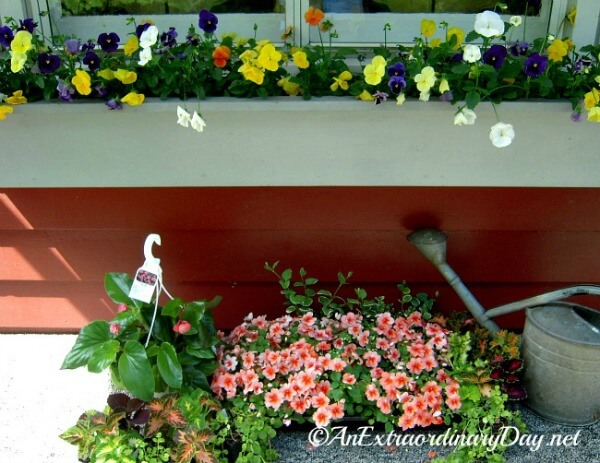
This is my window box of Pansies, nearing the end of its spring dress. They were transferred to another container to finish their growing season.
Now…let’s get down to the nitty-gritty details of how to plant a beautiful window box garden!
Two – line your box with plastic.
Let’s assume you are beginning with a new or clean window box. If not…clean it out of all previous soil.
Here I’ve used a black plastic trash bag as a liner for the box.

Cut the bag down each side, open it up, and you’ll have a long sheet of plastic just right for most window boxes.
Lay it in your window box. Keep in mind that it serves two purposes. One – to protect the box and give it a longer life. Two – to make it easier to change out the soil from year to year.
I don’t use plastic liners in most pots as it isn’t necessary. However, I do use them to line woven baskets and hanging containers with fiber or moss sides. Why? It keeps the soil in and helps hold moisture better.
Three – it’s time to add potting mix.
You’ll notice I used the term POTTING MIX. Do NOT use potting SOIL or dirt. Potting soil/dirt is heavy and not appropriate for container gardening. If you’ve used soil/dirt in the past and change over to a good quality potting mix you will be amazed at how the plants thrive in comparison.
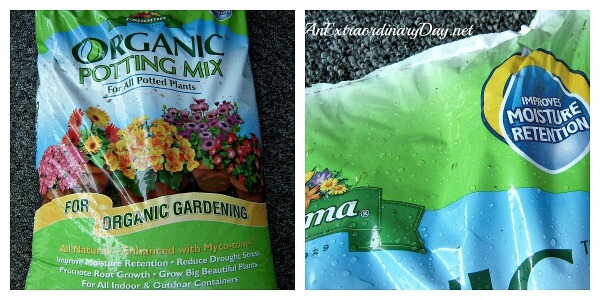
I look for a good light weight organic potting mix with moisture retentive ingredients. Why? Weight is a factor. Once the soil is damp, it’s much heavier. Just think of how much your watering weighs when it is full of water and how much of that goes into your container. I like to find moisture retentive ingredients in the soil mix so that I don’t have to worry if I’m away for a few days, or if it’s hot and windy. It really does make a big difference. I was really pleased with this Espoma potting mix
Here are a few free tips!! 😀 Fold over the sides of the potting mix bag (I use the large 2 cubic feet size bag), it helps to make the sides stay in place and upright, especially for watering the soil and for scooping. As I use the soil, I continue to roll down the sides of the bag. No more floppy sides!
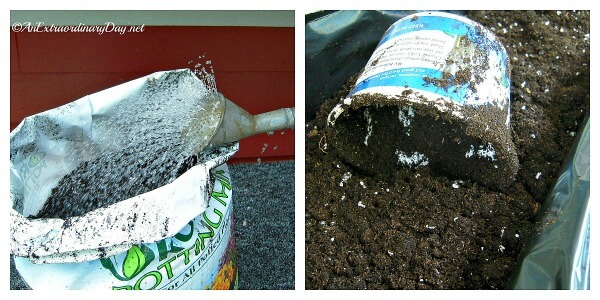
Yes, I’m watering my mix in the bag. Usually, the mix is fairly dry. Lightly water it so that you are planting in damp potting mix. Not a dripping wet soil mix. Scoop the potting mix with a container like my up-cycled cottage cheese container, pictured. You will need to water the potting mix as you dig deeper into the bag.
Fill the window box with the potting mix to about an inch from the top of the container.
Four – carefully cut away the excess plastic.
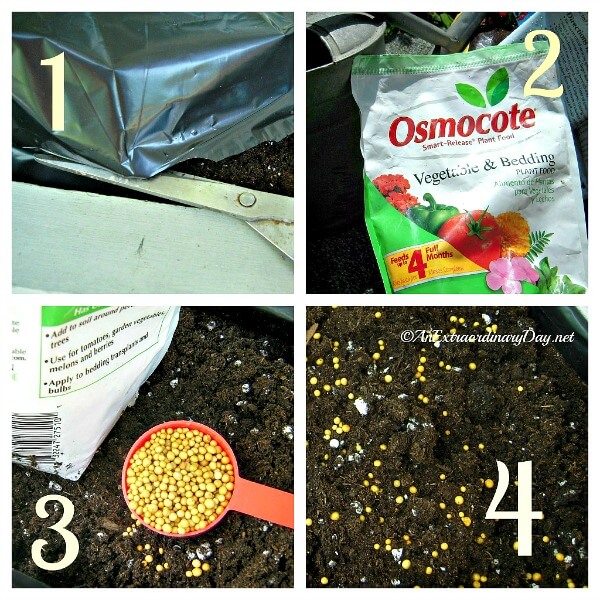
Photo 1 – use the rim of the container as a guide and cut off the excess plastic just below the rim.
Five – Fertilize!
You’ll see that I am using Osmocote Smart-Release Plant Food (Photo 2). This has been my go-to fertilizer choice for many years for my floral and ornamental container gardens and around my perennials, too. I like easy methods… efficiency… and good results. And I get all of that with Osmocote Smart-Release Plant Food
. (And no they didn’t pay me to write this….I just like the product…and for your convenience I’ve provided a link to my Amazon shop.) However, I do NOT use it for vegetable gardening of any kind even if the label says you may….there I’m an organic gardening girl.
Photo 3 – Follow the instructions on the bag for the proper amount for your container.
Photo 4 – This is what it looks like when you’ve applied the little plant food pellets to the soil. There’s no need to mix it in, as you plant that will happen. Also, watering and warm temperatures help release the nutrients into the soil.
Six – We’re now ready to plant our flowers!
Carefully remove the plant from the plastic cell pack.
Usually, I squeeze the container which helps to release the plant and then, gently pull it from its home, lightly, but firmly holding on to the base of the plant.

Lay out the plants in your window box for spacing.
Look at the tag and see what the spacing is supposed to be for the plants. In this case, it was 10″. Generally, I plant much closer than suggested as I want a full container. I’ve been known to plant plants right next to each other if the plants are any larger than a 4 or 6 pack size.
By laying out the plants, you won’t end up with a container that is extra full on one end or the other.

And now it’s time to put on our “meany” garden gloves.
If you aren’t wearing gloves for container gardening…I suggest you do. Nothing dries out fingertips faster than working in the “dirt.” I have several pairs of Latex gloves that serve well for me after I cut them down to wrist length and fold over the tops. That free tip is priceless if you have manicured nails.
Why the ‘meany’ gloves? You see, in order for this little plant to take root quickly and grow strong, we must pull apart its little roots. The plants I used here didn’t have really tight root balls, they loosened easily. Sometimes you’ll need to tear their roots or cut them to give them freedom (but don’t rip them off!). If you don’t do this, the plant will continue to grow its roots as they did in their little cell packs, round and round, and will not be well rooted in the window box and will not take up nourishment nor flourish. Let’s just call this “tough love” for plants.
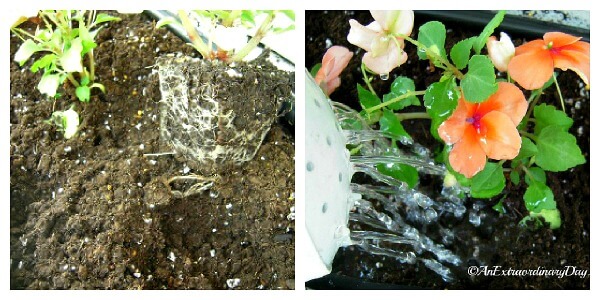
Using your nice, meany-gloved fingers dig a hole for each of your plants. Be careful to completely bury their little root balls. This very important. At the same time, don’t send them to the grave by burying them too deeply. Just bury them deep enough to cover the top of the root ball. By covering the tops of their root balls, you help ensure that they won’t dry out. This is one reason many containers fail and it’s so easy to do it right and achieve success.
Seven – Fill the watering can and water the transplants.
If you like, you can use a much-diluted liquid plant food in place of water. Don’t drown the little transplants, but water them well. Plan to water them lightly for the next few days if it is especially hot or windy.
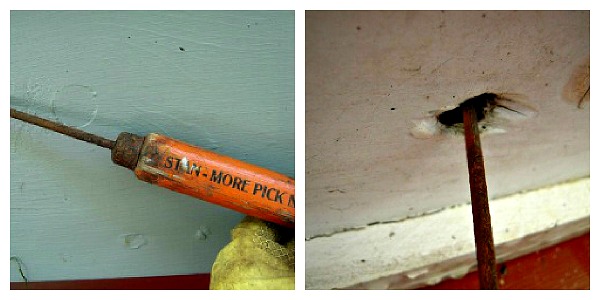
Eight – Create drainage holes.
We are assuming that the window box was originally made with pre-drilled drainage holes. Since you are hopefully reading this before starting on the project, be sure they are in place. We lined our window box with plastic which retains water. That is great, but we don’t want our little roots to rot in excess moisture. So, I get out my handy-dandy ice pick and poke holes in the plastic. You can do the same with any basket or container that is plastic lined. I always have poked my holes at this point in the project.
Admire the new, soon-to-be beautiful window box garden!
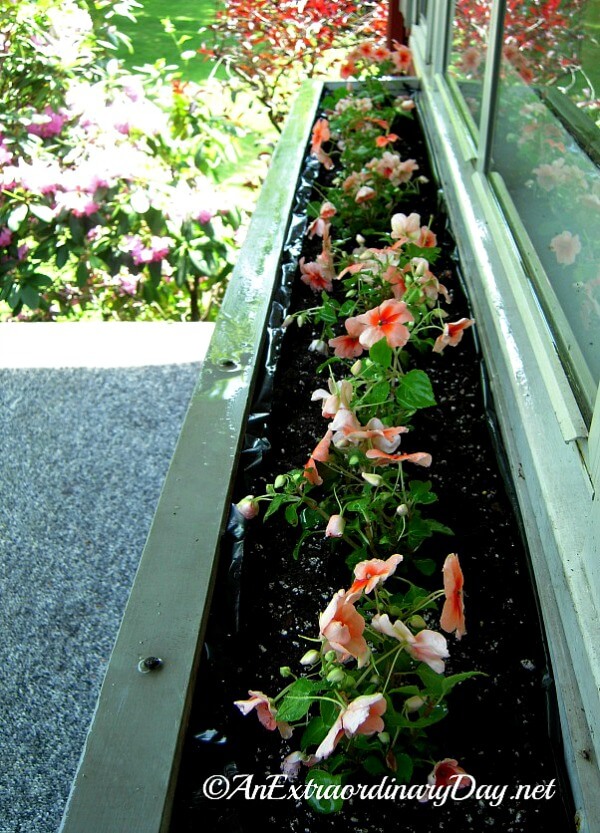
Here’s my window box simply planted with Envoy™ Butterfly Peach Impatiens.
For those of you who know of my usual fanciful window boxes, you may be wondering, “Is this all?”
This time, I believe less is more. My budget was limited last year and I realized that anything hanging down will not be seen from the street because of the bushes in front of the porch. When mature, these flowers will be 18-24 inches tall and will make a huge splash of color. A dramatic color statement.
To finish the task, I need to clean the box and the window sills from my little episode of “dirt flinging.” The little bit of black plastic that you see is really not that visible, except to the camera, and will completely disappear as the plants grow.
If you’re looking for more inspiration, you’ll like these container gardening ideas I shared HERE,
Lately, I’ve noticed that there are some pretty photos and container gardening suggestions floating around the web with just three words…thriller, filler, spiller. There is much more to creating a garden than fancy words ending with ‘er.’ I hope this becomes your go-to primer on how to plant a pretty window box garden.
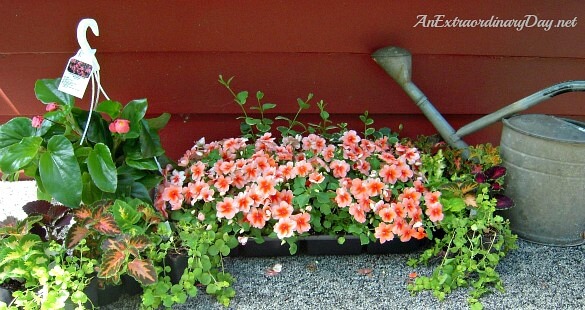
The plants you see above were the result of my greenhouse hopping. Several of the plants I added to the window box a few weeks later. You’ll notice the Dragon Begonia on the left. My supermarket had those for just $5 a hanging basket, and it contained 3 plants! That was the deal of the summer. Usually one of those plants would be $5 alone. Never again will I thumb my nose at supermarket flowers. They were good quality and healthy and I was able to purchase 2 more when I made the changes to my window box. I am in love with that Begonia! It really makes a dramatic splash.
Some of the Coleus, the Creeping Jenny, and the Variegated Vinca had been planted in some other containers and I ‘borrowed’ them back for my window box. I think I would have been happy with the Impatiens alone if they had performed well. Since they didn’t, I’m pleased that I was able to make it work with a $10 Begonia splurge.
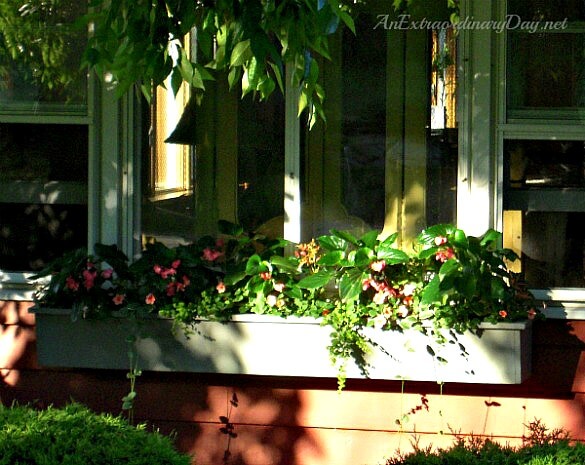
Above is a photo of the window box two weeks after it had been replanted. It’s already on it’s way to being stunning.

Here’s an end view glimpse of how the container looked midsummer in the morning sunlight. And you can see how the Impatiens never seemed to grow.
And yes… I’m a Master Gardener…. thank you Michigan State University for an amazing program. In order to receive certification, I had to volunteer in cooperation with my local extension. I don’t think I have ever had more fun making appearances at our farmer’s market giving demonstrations, speaking and giving demonstrations at local garden clubs, teaching a community ed class, and even giving a class at my local art museum. Container gardening makes my heart sing and I hope that this tutorial designed to help you successfully plant a beautiful window box imparts just a wee bit of the joy and information your way.
Please “pin” and share this image.


HERE ARE MORE GARDENING IDEAS
Click HERE for more Container Gardening Inspiration!
Click HERE for Fall Planting Ideas
Click HERE for Creative Planter Ideas
Thanks so much for popping by today!
If you enjoyed this post, please use the sharing buttons to share it with your friends and “pin it,” too.

Receive FREE inspiration like this in your inbox!


So many great tips, Diane! I love window boxes. When I first bought my house my father built a front porch for me and one of the things I asked for was window boxes. He made me the most wonderful window boxes that I had for years. Sadly, I don’t have them anymore but I will in my next home for sure. xo
I am so sorry that you no longer have your window boxes, Mary Beth. Wood that is pelted by the elements just doesn’t last forever, but what wonderful memories you have of your Dad making you something so special for you. That is priceless. {hugs}
Great information! Thank you so much! I love that variety of impatiens. I was at my garden center this morning, and they had a hanging basket with those impatiens plus a solid color impatiens that matched the rusty center. It was gorgeous!! Two years ago I had to deal with the fungus. The plants continued to bud, but would never bloom, and they lost most of their leaves. It was very frustrating! Last year I bought them at a different store and didn’t have any more problems.
Thank you, Kim! I haven’t spent as much time visiting nurseries and garden centers this year, but I have noticed that I’m not seeing many impatiens. Isn’t that interesting. How fun that you found this variety this year!
Thanks again for popping by. Hope your week is filled with special flowering moments!
It’s all gorgeous! Now I better go buy some flowers…
Thanks sweet friend and have a blessed day!