Easy tutorial and TIPS for making and styling a modern farmhouse 3 tiered tray.
And more farmhouse tray inspiration from 11 of my favorite blogging friends!
This post contains affiliate links for your convenience, which help support this site, at no additional cost to you, when you make purchases through those links.
It was Tuesday… I dropped Tim off at work and then swung around to Walmart for a quick kombucha
I looked over and a lady was just unlocking the door.
There I was… the first customer of the day with the whole store to myself, for a few minutes anyway, and no plan.

Maybe that’s best.
Do you ever notice that when you don’t have a plan you see way more possibilities than when you’re hunting for something specific?
As I strolled the housewares area of the store, I noticed a set of old deep cake pans, permanently nested together with a generous helping of clear packaging tape.
They had that look.
You know the look.
I could easily imagine Joanna Gaines creatively using them as wall decor in one of her fabulously decorated Fixer Upper homes that she seems to so effortlessly create.
But, instead, I imagined that they could become a terrific modern farmhouse tiered tray.
Frankly, I had no idea how I was going to pull off that great idea. BUT…. I would worry about that later.
There on Tuesday morning… in the middle of the Goodwill… I had a treasure.
The beginning of my own tiered tray that I could fill will all kinds of amazing decor.
And… I could have all that for a tiny fraction of the usual $70 price tag.
All it would take is a little bit of creativity and some old fashioned ingenuity.
I knew it was going to be great!
So great, that when I arrived home, I placed those cake pans smothered in packaging tape on the shelf in my studio closet and closed the door because impending greatness absolutely must be kept under wraps.
I saw them there whenever I needed some craft paint or a vase and I knew that someday… someday… they would take on a new life and become a fabulous Fixer Upper modern farmhouse style tiered tray.
And then I had this idea for my Fourth of July tablescape.
The smallest cake pan would be perfect.
So I turned upside down and used it as a pedestal for the centerpiece.
And after the holiday it went back into the dark closet.
Five months after they came home with me after that unexpected trip to the thrift store, those perfect Joanna Gaines-style cake pans were given new life and a bright future.
My friend Malia invited me to participate in a blog hop where all the participants present a farmhouse tray styled for fall with some DIY element.
Immediately I KNEW what I was going to do. The only thing…
HOW was I going to pull it off?
I wanted an easy, no muss, no fuss project that didn’t require mathematical calculations and bunches of power tools because who has time for all that?
And then it came to me… E6000
Here are the key ingredients to a
3 Tiered Modern Farmhouse Tray…

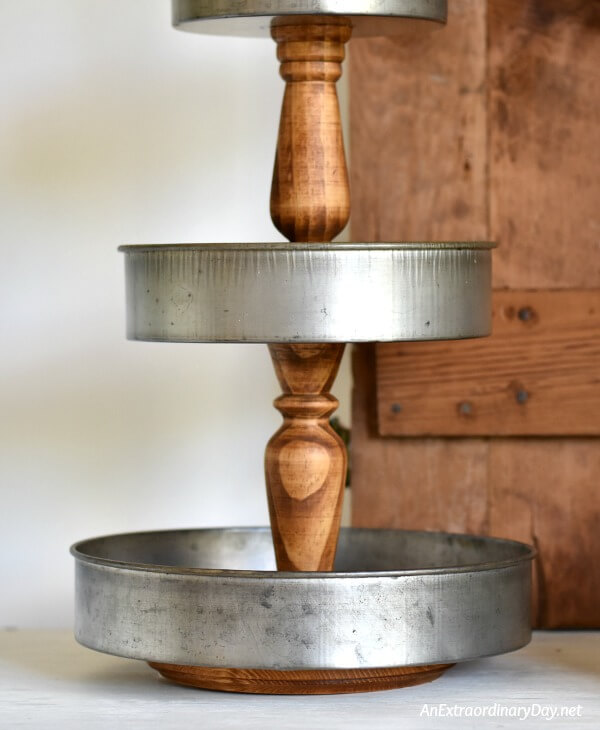
After considering several options, I finally settled on having wood spacers between the trays for that perfect juxtaposition of industrial and farmhouse.
I had decided that I would look for three turned pieces of wood. Maybe small candlesticks? Usually, when I need wooden items for projects I go to Hobby Lobby. I found what I was looking for… but just two… not three candlesticks.
Fortunately, there’s a Joann Fabric and Crafts down the road from the HobLob. They also had wood candlesticks, a thicker, slightly taller, more beefy feeling. They didn’t match. (Note: did you know that you can use your Hobby Lobby coupon at Joann’s in addition to the Joann’s coupon? Me either… but the cashier let me in on that big, little secret and now YOU are in the know. You’re welcome!)
I wasn’t quite so excited… my plan had a little hiccup.
Sometimes those disappointments are the best thing.
In the end, I decided that I like the beefier candlesticks between the tiers of my modern farmhouse tray in the making. And to give it even more visual interest, I 180’d one of the candlesticks.
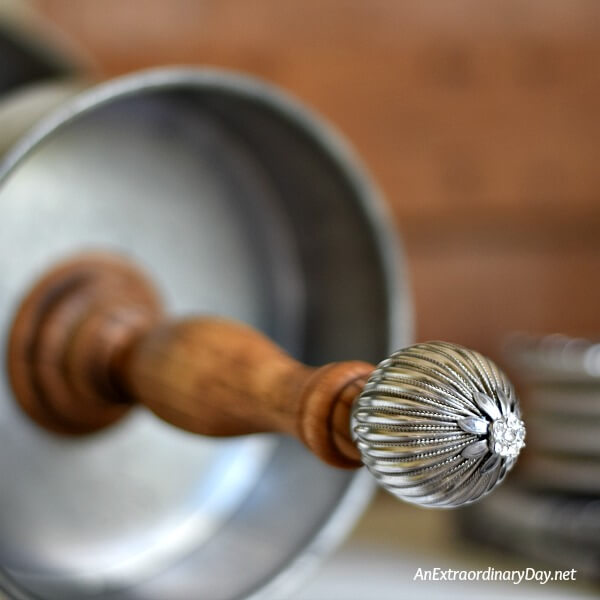
The small candlestick was perfect for the top, but I had an idea that it would look even better if I could trim a little bit off the top, drill a hole, and insert a cute knob.
Right now, I don’t have access to a saw, but I do have access to a friend who has every tool I could ever imagine. And he very graciously topped my candlestick for me. All I needed to do after that was sand it to round it off nicely and drill a hole for the knob (with the power drill
I could very easily have used the wooden candlesticks just the way they were.
At first, I thought maybe I’d paint them, or rub clear wax

The staining went fast. I used a disposable brush to apply the stain and then immediately wiped it off with a rag and let it dry.
When I purchased the candlestick I also purchased a large disc for the bottom of the tray to raise it up and give it a more finished look. That was also stained to match the candlesticks.
Just a side note here… this was the first time I used the Rustoleum stain
If you’re thinking, “What happened to easy, no fuss no muss?”
This really was a pretty easy project. AND… you do not have to stain the wood. For the top, you could use the entire candlestick and take out the screw from the knob and just glue the knob to the top of the candlestick, now finial. No power tools are necessary.

Once all the wood pieces dried, I carefully assembled them with E-6000, beginning with the wood disc on the bottom which I glued in place. Then, I placed a nice dab of the E-6000 on the candlestick
I did glue the whole project at one time, but while I ate supper, one of the tiers traveled a bit and had to be re-centered. (My middle cake pan had an uneven bottom.) I kept an eye on the project for a while and then left it to dry for 24 hours before I began to do any styling.

Seriously, I could not be more pleased with the outcome. Especially considering that it’s a little off kilter because of the slight bump in the middle cake pan. And try as I might, I didn’t drill the hole for my beautiful metal finial perfectly straight.
It’s perfectly imperfect.
The cake pans are significantly smaller than some of the large tiered trays
I really enjoy changing up my table with the seasons, or sometimes the week when an exceptional bouquet of flowers calls my name at the grocery store.
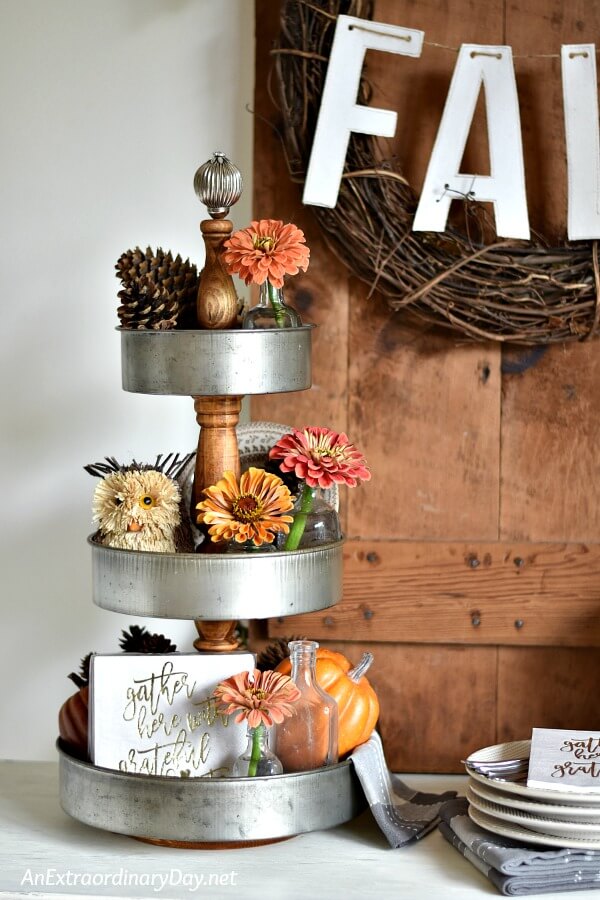
This has been the season of fresh flowers for me. These rusty colored, perfect for fall Zinnias were waiting for me at the farmers’ market my last trip there. I’m sure they were left behind because they weren’t the vibrant oranges, yellows, or fuchsia that we so often see. I love these soft muddy shades of color that gently usher in fall.
Styling TIPS for Getting that
Modern Farmhouse Look for FALL in a 3 Tiered Tray
This is a visual/pictorial guide to help you see how the various elements were added, step by step.
Let’s start with the bottom tray…

Moving on to styling the middle tray…
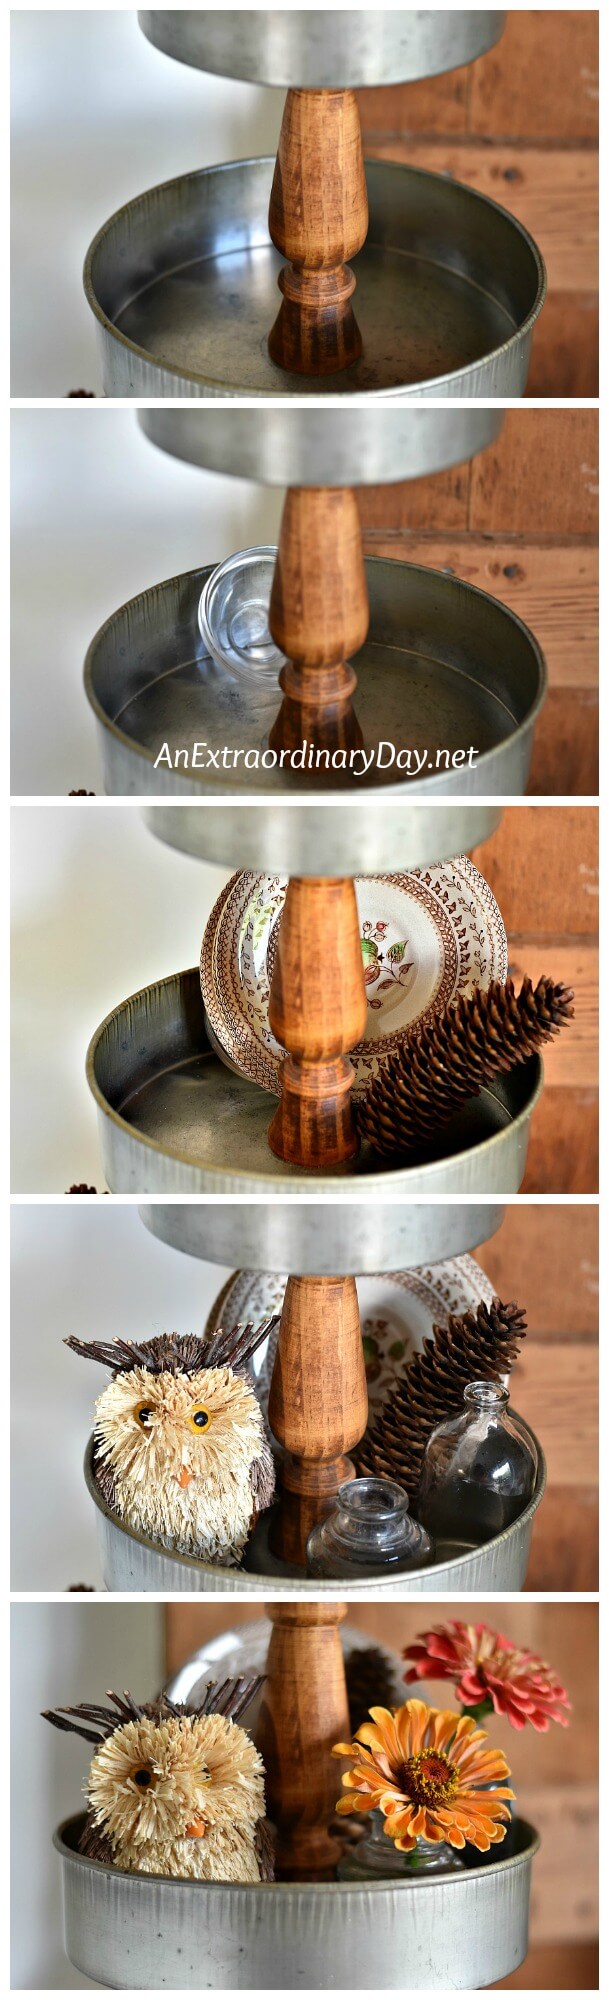
And finally, the top tier of the tray….

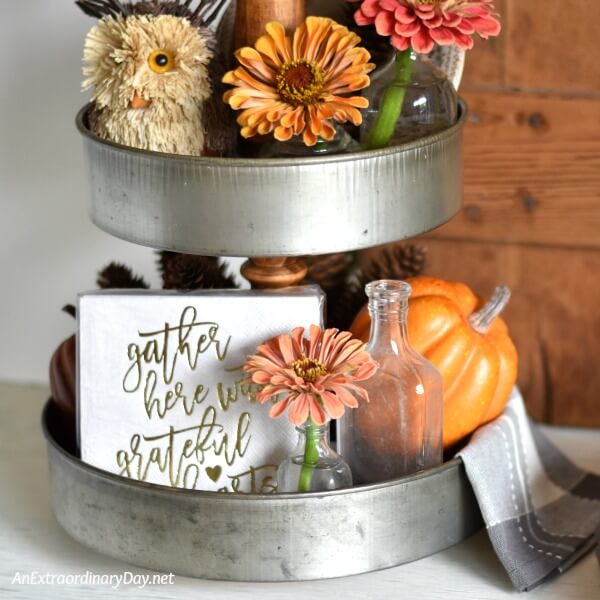
Styling a modern farmhouse tiered tray is all about using different textures, elements from nature, common everyday items, and vintage items all in varying height and sizes. The trays help to frame the various elements and bring a cohesiveness and repetition to the overall look. The goal is to repeat a few of the elements on each tray. Here I used pine cones on every tier as well as vintage bottles filled with flowers. Though the flowers are in different fall shades of color they really make the tray come to life.
The owl adds a bit of whimsy and the napkins provide some graphic interest.
All of this is appropriate for a dining space and makes the area feel homey and welcoming to guests.
Who would guess that an unexpected trip to the thrift store would yield such a fabulous score?
I wonder if my car will take me on another unexpected and profitable adventure?
My friends have also created some extraordinary fall trays to inspire you.
Please be sure to visit them and leave a comment for them, too.

Check out these other fabulous Farmhouse Trays!
Yesterday On Tuesday Home with Cupcakes and Crinoline An Extraordinary Day
Inspiration for Moms Domestically Speaking Celebrating Everyday Life
The Country Chic Cottage Clean and Scentsible Redhead Can Decorate
Mad in Crafts Pet Scribbles Uncommon Designs
Thanks so much for popping by today!
If you enjoyed this post, please use the sharing buttons to let your friends know and “pin it,” too.

Receive FREE inspiration like this in your inbox!


Diane, you are my hero– your tray is gorgeous! I love how you styled it too. Thanks so much for participating in this hop!
You are so sweet, Malia! 🙂 Thank you for your lovely compliments and for inviting me to participate. xo
Such a great way to make a tray!
Awww… thanks, Angie! It turned out even better than I imagined it.
Oh my goodness Diane — I adore the tray you made, and love the way you gave new life to those pans!
Thank you so much, Laura! Repurposing things is so much fun, wish I was a bit better at seeing the possibilities when I’m in a thrift shop.
Oh boy Diane!
One of my favorite things is to take something that was “born” as one thing and turn it into another. You did fabulous!
Blessings to you!
Minnie
Minnie, I totally agree, it really is a terrific feeling to rebirth something.
Thanks for your kind words!! xo
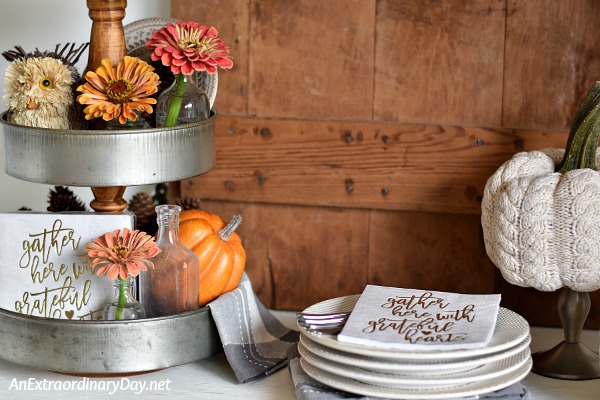
What a beautiful tiered tray, Diane! And it’s a great upcycle/recycle creation! I love the stain you chose. It matches perfectly the furniture piece showing in the background!
Thank you, Gail! That stain match was a happy coincidence. Love when that happens!!
OMG, this is so adorable, I love it.
Oh Ivory, thank you so much!!
This is so pretty!! 🙂
Awww… thanks, Stacey!! It was a very rewarding project.
Did you have to polish up the cake pans?
Suzanne, I have not polished them. They look perfect (too me) the way they are and are easy to keep clean with a simple damp wipe or dusting.
All the best for an extraordinary day!
This is so beautiful, Diane! I would use this all year!! I was thinking maybe wooden salt & pepper shakers might be able to work for the middle (if cut). I see those things at thrifts stores often. Thank you for such wonderful inspiration!!
Thank you, Julie! I do see those S&P’s from time to time… I think you’re right, they’d work great! Hmm… maybe I’ll have to create another one sometime. 😉
What a find! I love your tray! It’s beautifully styled too.
You are so sweet! Thank you, Maryann!!! I do feel so blessed to have discovered those pans.
Your tray turned out perfectly, Diane! I love the stain you chose to get the vintage farmhouse look and the disk on the bottom is genius!
Thank you, Mary Beth!! The stain was a risk… you never really know what color you’re getting judging just by the picture on the can. 😉
The bottom disk was attached a little bit for looks, but mostly because I wanted to be able to pick it up from the bottom. Mission accomplished.
Thanks so much for hosting this fun blog hop. xo
You won the thrift store lottery! This tray is beautiful and I’m sure Joanna Gaines would be green with envy. I have several old cake pans that I no longer use and this is perfect. Thank you for sharing with us this week at Celebrate Your Story and we hope you will join us again next week.
Oh, Sandra… you know how to make a girl’s day! Thank you so much for your kind encouraging words. {{hugs}}
It is just beautiful Diane! I love your tray and your story so much!! My car likes to drive itself to the Thrift store too!! 🙂 You did a wonderful job! Happy Fall!!
Our cars must be kindred spirits! 🙂 Thanks friend for the lovely encouragement. You know YOU helped make this look good. 😉
I have a friend who has Dunkin Donuts and Goodwills programmed into her GPS! I used to tease her that her car pulled to the R when we went by a DD! Your tiered stand is awesome and can be styled for so many things–cocoa bar in the winter, fruit and nuts. Craft supplies….you name it! Nice job.
I LOVE it!! Your friend enjoys the finer things in life, for sure!! 😉
Thank you, Kathy, for your kind words! xo
Diane, this is just the cutest idea! I’ve wanted one of these tiered trays but knew making one would be a great option. With tutorial, I can do it!! Now to find the right components. Have a great day!
I love it! I, too, have wanted a tiered tray, but have put it off because of the price. Now I will be looking for cake pans instead!
I absolutely love this tiered stand and how you made it. I did NOT know about the coupon thing — score! I haven’t made one because I haven’t found the perfect pans, but you certainly did! Thanks for sharing at Vintage Charm! Pinned!
xo Kathleen|Our Hopeful Home
Oh Diane I love this. SO many possibilities. Featuring when my party opens!
Love this tiered tray! Thanks for the idea with the wooden candlesticks. I’ll be keeping my eyes open when I visit thrift shops. Also like the fall decorations. Can’t wait to see what you do next!
This is by far my favorite diy tray! Honestly Diane I am not sure what I love more the final product or the instruction! You are a hoot!
Kelly, you made my day!! Thanks so much!! Hope you get a chance to make a tray for yourself, too!
Wow, your tray came out awesome. Where would you find those cake pans though? I have looked everywhere?!
Thank you so much, Carol! I didn’t find the pans… my car drove me to them. Wasn’t that just the silliest story in the post? I often see them in thrift stores. Good Luck!!
What did you use the the metal were they cake pans? I love this idea thinking about making my own!
ALL the details regarding the pans and how to make your own tiered tray are in the post, Taylor. Hope it helps so you can make your own, too!!
I absolutely love the cake pan idea, it’s genius! I recently updated our master bathroom, and I’ve been looking for an easy, yet cheap way to make a tiered tray to use on our counter top just to hold bathroom items like q-tips, cotton balls, etc. All the others I’ve looked at require some expensive components. Yours is the best I’ve seen so far! I’m all about perfectly imperfect. A running theme on my DIY website (it’s new so there aren’t tons of posts yet, but I have several in the pipeline). I also had an incredible Good Will find that I let sit for a few months. I held on to it in the store like I had found gold ? It is a hand forged iron chandelier that holds candle sticks. It’s amazing. It’s on the smaller side though, and I didn’t know what I was going to do with it. It is too small to hang over a table or in an entry way (plus I need actual light in those areas). It wasn’t until I updated the bathroom that the idea to use it there came to me! “What would Joanna do” is always on my mind when thinking of things to make and repurpose. The chandelier totally reminds me of something she would use in a Fixer Upper, just as your tray does. You and I seem to be on the same wavelength! Love this post, thank you for the inspiration ?
I honestly have almost never commented on post like this….but I had to. This is more than amazing! I have been trying to make an attempt at a small counter coffee bar for weeks now. Have traveled near and far…HobLob; Michaels; Joanns….btw, I am a seasoned thrifter….and have not had any luck trying to find what I want….without it, of course costing a fortune. Until now….came across this…and my thoughts were “WOW”!. I could totally make this! I think we are ALL a bunch of kindred spirits…my car is at the thrift store parking lot all the time!!! Know all the staff by name! Thanks so much for sharing this…..
I am making the tiered tray, with my own twist on things, but my problem is E-6000! it is not holding the wooden candlesticks to the metal pans, even after 48 hours, any weight added to the middle pan dislodges the glued candlestick! What’s going wrong?
Reply to Billie Hooper please….e6000 did not stick on mine either. Have tried E6000, Silicone & glue gun…nothing holds. Help.
Jeanene, I have absolutely no idea why the E6000 did not stick for you. Yes, it takes time… I always give it several hours so after 48 hours you should have been able to pick it up with no problems. I have NEVER had a problem with that adhesive and I know any others who use it for projects too. The only thing… I wonder if your surfaces needed to be cleaned first? Maybe there was some sort of residue on them. The only thing I could suggest it to clean them with steel wool and Windex and try again. I did read this on the company website: “E6000 starts getting tacky in approximately 2 minutes and begins setting in approximately 10 minutes. A full cure takes between 24 and 72 hours. Remember, temperature and humidity will affect dry time. To speed drying, apply heat using a handheld dryer set on low.” Other than that… please contact the company through their website at: http://eclecticproducts.com/e6000-industrial-adhesive.html And please let me know how things turn out.
Dear Billie… I have absolutely no idea why the E6000 did not stick for you. Yes, it takes time… I always give it several hours so after 48 hours you should have been able to pick it up with no problems. I have NEVER had a problem with that adhesive and I know any others who use it for projects too. The only thing… I wonder if your surfaces needed to be cleaned first? Maybe there was some sort of residue on them. The only thing I could suggest it to clean them with steel wool and Windex and try again. I did read this on the company website: “E6000 starts getting tacky in approximately 2 minutes and begins setting in approximately 10 minutes. A full cure takes between 24 and 72 hours. Remember, temperature and humidity will affect dry time. To speed drying, apply heat using a handheld dryer set on low.” Other than that… please contact the company through their website at: http://eclecticproducts.com/e6000-industrial-adhesive.html And please let me know how things turn out.
Hi. So you didn’t do anything to the pans to give them the galvanized look?
Tina, I found my pans just the way they were. If you Google… I think you can find a way to galvanize metal… but I think it includes using a toxic drain cleaner. There may be a spray paint that would work, but I’m not sure.
Hi Tina! I’m sorry somehow I missed your comment. 🙁
No, I didn’t do anything to the pans… I was just very fortunate to find some like that. If yours are shiny, I would try sanding them and then dipping them in straight vinegar. I hope it works for you!
Diane, I am new to your blog and just found this precious idea! Would you mind sharing the dimensions of the cake pans and candlesticks that you used. I realize that this was some time ago and you might not have them handy.
Hi,,,a beautiful tray,,,can you link please where did you got the upper wood part from the try,,,thx
Hey Shreen! All the wood pieces are candlesticks. I purchased mine at Hobby Lobby and Joann’s… here are some from Amazon: https://amzn.to/3azn6pK The top one was trimmed with a saw and then drilled and then the knob inserted and glued in. Hope that helps!
Beautifully made tray, love it
Thank you so much, Doris! How kind of you to take the time to leave your encouraging thoughts! Be safe! >3
This is fantastic. I will have to check our local goodwill stores and see what treasures I might find. Hopefully I will be as lucky as you. You did an amazing job with your tray. It is just beautiful!
Awww thanks, Maggie! My fingers are crossed that you’ll be as lucky and I was.
Happy New Year!
You did a great job. I want to make one and use a rolling pin in the middle of trays as it will be for my baking area in the kitchen.
Thanks so much Kaylene!! Please let me know if you make one with a rolling pin. I think that’s a fabulous idea!!!
You are a HooT and I must be your long lost twin sister because I visualized myself during your whole experience. Please share your projects with experiences and do NoT change a bit!
Awwww…. Nancy, you just made my day!!! Thank you for your warm and encouraging words.
I’ll let you in on a little secret — sometimes I go back and read my stories and relieve the memory through them. 😉 Thanks for “traveling” with me and have the most extraordinary day!